
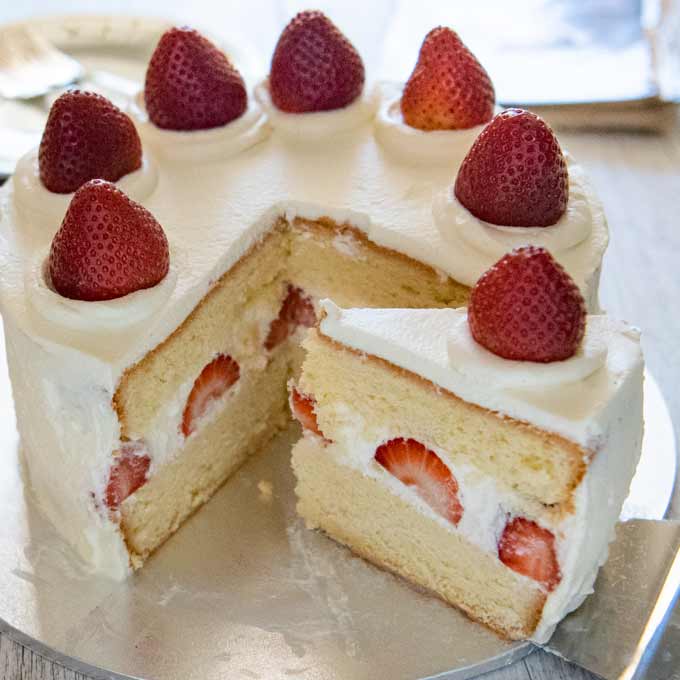
Japanese Strawberry Sponge Cake (Strawberry Shortcake)
Ingredients
Sponge Cake

all-purpose flour (sifted)
125 g

sugar
100 g
large eggs (yolks and whites separated)
4 pcs

butter (melted)
60 g
butter (for greasing)
10 g
Decoration

strawberries
18 pcs

cream (for whipping)
400 ml
sugar
10 g
Syrup
water
40 ml
sugar
10 g
Instructions
Preheat oven
Pre-heat oven to 180°C fan forced.
Prepare cake tin
Coat the inside of an 18cm cake tin with butter, dust with flour, then shake off the excess flour.
Beat egg yolks
Put the egg yolks in a bowl, add ⅔ of the sugar and beat the egg yolks until they become whitish and thick. Draw a ribbon with the whisk and if the ribbon disappears slowly, it is ready.
Make meringue
In a separate bowl, beat the egg whites. When the small bubbles form and the volume of the egg white doubles, add the remaining sugar in 2-3 batches and beat further to make meringue.
Check meringue readiness
When the meringue becomes firm and it can form a peak when you lift the whisk, it is ready.
Add flour to yolk mixture
Put the flour through the sifter and add to the beaten egg yolk. Fold the batter with a spatula.
Mix in first portion of meringue
Transfer ⅓ of the meringue to the batter and mix with a whisk until the batter becomes smooth.
Fold in remaining meringue
Add the remaining meringue to the batter in 2-3 batches and fold.
Add melted butter
Pour the melted butter into the batter and fold several times. It's OK even if the butter is not completely mixed.
Transfer batter to tin
Pour the batter into the cake tin. Drop the tin onto the work bench to settle the batter in the tin.
Bake the sponge cake
Cook in the oven at 180°C for 25 minutes. Insert a thin bamboo skewer in the centre of the cake to see if the skewer comes out dry. If the skewer is a bit wet, cook further 5 minutes.
Cool the cake
Take the tin out of the oven and drop the tin onto the workbench a couple of times to detach the cake from the tin. Remove the cake from the tin and place it on a rack, upside down (bottom side up). Let it cool completely.
Make syrup
If making syrup, put the Syrup ingredients in a small saucepan and bring it to a boil. When the sugar is dissolved, turn the heat off. Let it cool.
Whip cream and prepare strawberries
Add sugar to the cream in a bowl. Whip the cream until soft peaks form. Wipe the strawberries with a wet kitchen paper, remove the stems and halve 10 strawberries.
Slice the cake
Leave the sponge cake upside down as is and slice it horizontally in half, remove the top half and place it next to the bottom half of the cake, cut side up.
Brush with syrup
Using a brush, coat the cut surface of the two sponge cakes with the syrup gently.
Add cream and strawberries to bottom layer
Drop about 3 heaped tablespoons of the whipped cream on the bottom half of the sliced cake and spread it to cover the entire surface. Fill the surface with the halved strawberries, without a gap as much as possible.
Cover strawberries with cream
Drop about 4 heaped tablespoons of the whipped cream on and spread it to cover the strawberries and the round edge.
Assemble the layers
Place the top half of the cake on it, syrup side down. Gently press down, making sure the top and bottom cakes are aligned. Fill the gap around the strawberry filling on the side with whipped cream.
Chill cake briefly
Thinly coat the top and the side of the cake with whipped cream. Leave the cake in the fridge for 10 minutes.
Final cream coating
Using a cake spatula or a long flat spatula, fully cover the top and the side of the cake with the remaining whipped cream, leaving some (about minimum of 4-5 tablespoons) for piping.
Pipe cream and add final strawberries
Put the remaining cream in a piping bag with a round nozzle. Squeeze out the cream to make a mound of cream in 8 positions around the edge of the surface. Place a strawberry on each mound.
Original recipe
Storage
Consume within 2 days. The sponge cake will keep longer, but the flavour of the strawberries and cream start degrading by the 3rd day.
Your kitchen, together
Try Chopa today
Save recipes, plan meals, and manage your groceries — all in one place.